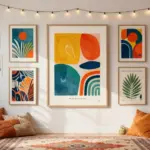
Creating a personal space that reflects your unique style can be a challenge, especially when it comes to decorating your teen room. You want your walls to tell a story about who you are and what you love. That’s why I put together this list of 18 teen room wall decor ideas that will not only brighten your space but also infuse it with your personality. Each idea uses upcycled materials, making your room stylish and eco-friendly at the same time.
If you’re a teen looking to express your creative side through decor, you’re in the right place. Whether you’re passionate about art, nature, or just want to showcase your favorite memories, these ideas will inspire you. I pulled together some fun and practical decor options that are easy to make. Each concept is designed to help you transform your blank walls into something spectacular, vibrant, and truly yours.
By the end of this post, you’ll have a variety of personalized decor ideas that not only enhance your teen bedroom design but also give your space a fresh, youthful vibe. So grab your supplies and get ready to dive into some DIY projects that will turn your walls into a canvas of creativity!
Key Takeaways
– Discover upcycled wall art ideas that are unique, budget-friendly, and environmentally conscious.
– Explore ways to create a vintage magazine collage that showcases your interests and passions.
– Learn how to make DIY wooden signs that add a personal touch to your room with messages that inspire you.
– Find out how to use photo wall grids to display your favorite moments and create a cheerful atmosphere.
– Get tips on crafting inspirational quote walls that motivate you every day and reflect your personality.
1. Upcycled Fabric Wall Art

Transforming fabric scraps into wall art is an incredible way to showcase your unique style. This creative project allows you to stitch or glue together various fabric pieces, crafting colorful abstract designs or cozy quilt-like patterns that add warmth and texture to your space. Imagine vibrant hues of cotton paired with textured linens, creating a stunning visual display that invites comfort and creativity into your room.
To implement this idea, consider visiting local thrift stores for fabric remnants or using old clothing you no longer wear. This DIY project encourages customization according to your tastes, making it a fantastic way to express your creativity while being eco-friendly.
Consider these steps to create your fabric wall art:
– Gather fabric scraps in various colors and textures.
– Cut them into shapes or strips.
– Arrange them on a canvas or directly on the wall.
– Secure them with fabric glue or staples.
– Add a frame for a polished look.
This approach not only personalizes your space but also enhances the overall aesthetic through the rich textures and colors of the fabrics.
2. Vintage Magazine Collage

A vintage magazine collage brings a nostalgic flair and vibrant personality to your teen room. By recycling old magazines, you can celebrate your interests and aesthetics, creating a visually dynamic display that reflects your individuality. Imagine a wall adorned with colorful images and inspiring quotes that tell your story, from favorite bands to travel dreams.
To create this collage, start by rummaging through second-hand shops or your own collection of magazines. This project not only showcases your personal style but can also evolve over time, allowing you to update it as your interests change.
Here’s how to create your vintage magazine collage:
– Collect vintage magazines that resonate with your style.
– Cut out images, quotes, and patterns that speak to you.
– Use a large poster board or apply them directly to the wall.
– Secure them with mod podge or washi tape.
– Add a varnish layer for protection.
This collage will serve as a dynamic representation of your personality, adding vibrancy and charm to your space.
3. DIY Wooden Signs

DIY wooden signs are a charming way to display your favorite quotes or affirmations, infusing personality into your teen room. Using reclaimed wood not only adds character but also aligns with the rustic design trend that is currently in vogue. Picture a wall adorned with inspiring messages, surrounded by your favorite colors and textures, creating a cozy atmosphere.
To bring this idea to life, explore local lumber yards or ask friends for leftover wood materials. You can personalize these signs to match your room’s theme, making them versatile decor that can be easily rearranged.
Follow these steps to create your wooden signs:
– Collect pieces of reclaimed wood or pallets.
– Sand them down to smooth rough edges.
– Paint your favorite quotes using stencils or freehand.
– Attach hooks or wires for hanging.
– Optionally, apply a sealant to protect the wood.
This project not only enhances your decor but also allows for personal expression through meaningful words and designs.
4. Shadow Box Displays

Shadow boxes offer a creative way to display collectibles, travel souvenirs, or cherished mementos, adding a three-dimensional aspect to your wall decor. These unique displays not only enhance the aesthetics of your room but also tell a story about your life experiences, from adventures to hobbies.
To craft your shadow box, consider visiting craft stores for affordable options or even making one from materials you have at home. They can be customized to reflect various themes, making them a vibrant focal point in your space.
Here’s how to create a shadow box:
– Collect items like postcards, souvenirs, or photographs.
– Choose a shadow box in a complementary color.
– Arrange items inside, experimenting with layout before securing them.
– Use hot glue or mounting putty to fix items in place.
– Hang it on the wall or place it on a shelf.
This decor idea invites conversation and showcases your personality beautifully.
Shadow Box Displays
Editor’s Choice


5. String Art Designs

String art is a fun and interactive way to add a personal touch to your room. By using nails to outline designs and colorful strings to fill them in, you can create captivating pieces that not only stand out but also reflect your creativity. Imagine a vibrant design that pops against a plain wall, drawing the eye and sparking conversations.
To get started, gather supplies from your local craft store or use materials you already have at home. This project is great for group activities, promoting collaboration and creativity among friends.
Here’s how to create string art:
– Choose a simple design or shape to create.
– Draw the outline on a wooden board or canvas.
– Hammer small nails into the outline at equal intervals.
– Tie string around the nails, crisscrossing to fill the design.
– Hang it on your wall to enhance your decor.
This dynamic art piece adds color and dimension, making your room feel more alive.
❝ Fun fact: A single string art piece can spark a room’s vibe in under 45 minutes using nails, thread, and upcycled materials. Teens love designing their own shapes—it’s perfect for teen room wall decor and group projects at home. ❞
How To Choose Teen Room Wall Decor
Choosing the right wall decor for a teen’s room can feel overwhelming. You want it to reflect their personality while fitting into the overall design of the space. Here’s a guide to help you navigate the selection process and find the perfect pieces for that creative teen bedroom.
1. Style Preferences
Start by discussing your teen’s style preferences. Do they lean towards bohemian, modern, vintage, or minimalist designs? Knowing their style can help narrow down options significantly. Look for inspiration from magazines, Pinterest boards, or Instagram accounts that resonate with their taste. This step is essential because it sets the tone for the entire room.
2. Size of the Wall Space
Measure the wall space where you plan to hang the decor. Large pieces can create a focal point, while smaller items can be grouped for a gallery effect. For instance, if you have a wall that is 10 feet wide, consider using one big canvas or a series of smaller frames. This will ensure that the decor complements the room’s dimensions rather than overwhelming or underwhelming them.
3. Material Considerations
Think about the materials of the decor items. DIY projects using upcycled materials can add a personal touch while being eco-friendly. For example, wooden signs or fabric wall art can bring warmth and texture to the space. Consider how these materials will interact with existing furniture and decor. Mixing textures, like metal with soft fabric, can create visual interest.
4. Budget
Set a budget for your decor project. Wall art can range from affordable DIY options to pricier custom pieces. Determine how much you want to spend to avoid overspending. You can find budget-friendly options at thrift stores or online marketplaces. Don’t forget to factor in the costs of any tools or supplies if you’re going the DIY route.
5. Personalization
Aim for decor that reflects your teen’s unique personality. This could be through their favorite colors, quotes, or images that resonate with them. Personalized items, like a wall hanging made from their favorite fabric or framed artwork they created, can make the room feel special. Encourage them to have a say in the selection process to ensure they feel connected to their space.
6. Functionality
Consider how the decor will function in the room. Is it purely decorative, or does it serve another purpose? For example, a chalkboard wall not only adds style but also provides a space for notes, drawings, or reminders. Multi-functional pieces can help keep the room organized and add a fun element to the decor.
Pro Tip: When in doubt, start with a neutral base and add pops of color or personality through smaller pieces. This can make the room feel cohesive and allow for easier updates in the future as your teen’s style evolves.
By following these steps, you can help your teen choose wall decor that is not only stylish but also meaningful and functional. Embrace their creativity and let their personality shine through in their room design!
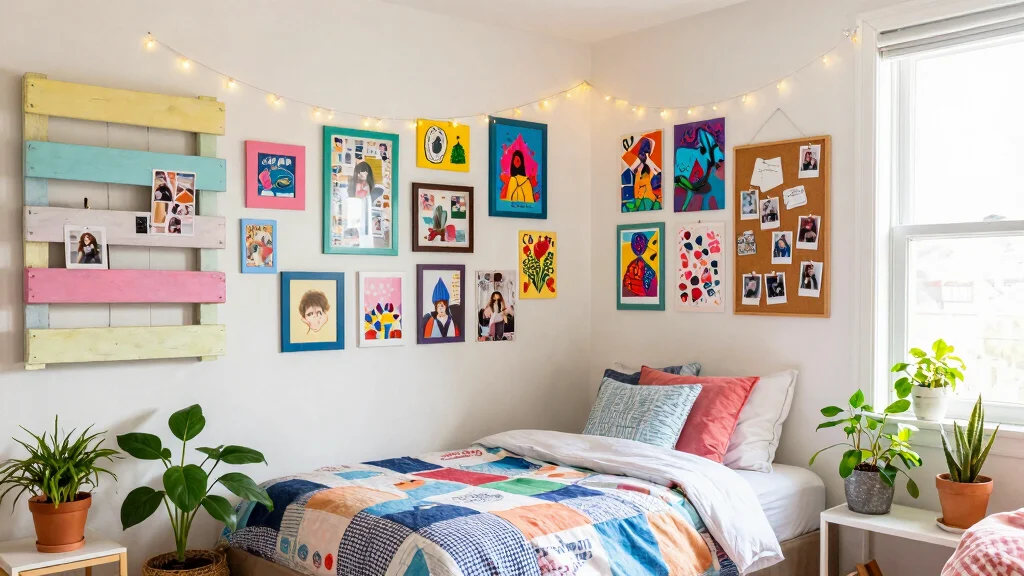
6. Photo Wall Grid

A photo wall grid is a fantastic way to showcase your favorite memories while adding visual interest to your space. This stylish decor idea can adapt to various aesthetics, whether you prefer a minimalist layout or a colorful, chaotic arrangement. Imagine a wall filled with photos that capture friendships, adventures, and milestones, creating a personal narrative.
To create your photo wall grid, consider printing your favorite photos in different sizes and colors that complement your room. This project is not only fun but also allows you to continuously refresh your display as new memories are made.
Follow these steps to set up your photo wall grid:
– Decide on the layout, either symmetrical or asymmetrical.
– Print favorite photos in various sizes, keeping a color scheme in mind.
– Use washi tape or clips to mount the photos.
– Add decorative elements like quotes or art pieces.
– Update the photos regularly to keep it fresh!
This decor style serves as both a personal statement and a source of inspiration in your space.
Your teen room wall decor shines when memories become art. Start a photo wall grid by printing favorite pics in different sizes and color tones that fit your vibe, then swap in new shots as adventures happen.
7. Painted Canvas Artwork

Creating your own painted canvas artwork can serve as a stunning centerpiece that reflects your personality and style. This DIY project allows you to unleash your creativity, transforming a blank canvas into a vibrant expression of your imagination. Picture bold colors and unique designs coming together to create an eye-catching focal point in your room.
Start by gathering supplies from a local craft store, including a canvas and acrylic paints. This project is not only enjoyable alone but can also be a fun activity to share with friends, fostering creativity and collaboration.
Here’s how to create your painted canvas:
– Gather supplies: a blank canvas, acrylic paint, brushes, and an apron.
– Choose a color palette that complements your room design.
– Get inspired with designs, from abstract to landscapes.
– Start painting, layering colors and textures.
– Hang your masterpiece on the wall for a gallery feel.
This custom artwork personalizes your space, making it a true reflection of who you are.
8. Chalkboard Wall

Transforming a section of your room into a chalkboard wall adds an interactive and playful element that encourages creativity. This functional decor idea allows you to express yourself through drawings, quotes, or even to-do lists, making it a practical addition to any teen space.
To create your chalkboard wall, select a suitable wall or plywood and purchase chalkboard paint. This project is perfect for those who enjoy changing their decor frequently, as you can easily update your designs as often as you like.
Here’s how to create a chalkboard wall:
– Select a wall or plywood for your chalkboard.
– Paint it with chalkboard paint and allow it to dry.
– Use colorful chalk to write quotes or draw doodles.
– Clean it as needed and let creativity flow!
– Consider adding a frame for a polished look.
This interactive wall serves as a canvas for your imagination, adding vibrancy and life to your room.
A chalkboard wall is a crave-worthy upgrade for teen room wall decor—it’s your blank canvas for doodles, to-do lists, and quick quotes. Change it as moods shift; the wall grows with you, not against you.
9. Recycled Jar Organizer

Upcycling glass jars into stylish wall organizers is a fantastic way to combine functionality with decor. This project is perfect for displaying small plants, art supplies, or personal treasures, adding both charm and organization to your space. Imagine colorful jars filled with succulents or art tools, creating a quaint yet practical display on your wall.
To create your recycled jar organizer, start by collecting jars and considering a color scheme that complements your room. This project not only helps with organization but also adds a rustic flair, showcasing your creativity through upcycling.
Here’s how to create a recycled jar organizer:
– Collect glass jars and clean them thoroughly.
– Paint the jars in coordinating colors.
– Secure them to a wooden board or directly on the wall.
– Fill the jars with plants, pens, or other small items.
– Arrange it at eye level for easy access and aesthetic appeal.
This project not only enhances organization but also brings a delightful element to your decor.
10. Neon Light Signs

Neon light signs add a contemporary and energetic vibe to any teen room. With the ability to personalize them to reflect your style or interests, these eye-catching pieces can transform your space into a vibrant haven. Picture a neon sign glowing with your favorite word or phrase, creating a fun atmosphere that’s perfect for selfies and gatherings.
To create your neon light sign, choose a phrase that resonates with you and gather flexible neon tubing. This project is enjoyable and can be tailored to suit your unique aesthetic, making it a trendy addition to your decor.
Here’s how to create your neon light sign:
– Choose a word or phrase that inspires you.
– Purchase flexible neon tubing and a battery-operated light source.
– Shape the tubing into your design and attach it to a backing board.
– Secure the light source for illumination.
– Hang your neon sign on the wall for a pop of color.
This trendy decor element not only lights up your room but also adds a fun touch that reflects your personality.
11. 3D Wall Art with Paper Mache

Creating 3D wall art with paper mache allows for endless creativity and unique designs. This fun technique can be done alone or with friends, making it a perfect collaborative project. Imagine eye-catching shapes and vibrant colors adorning your wall, adding depth and personality to your space.
To get started, gather materials such as newspaper and glue, which are often readily available at home. This project not only results in beautiful decor but also encourages artistic expression and teamwork.
Follow these steps to create 3D wall art:
– Gather materials: newspaper, glue, and a chosen armature.
– Tear the newspaper into strips and dip them in glue.
– Layer the strips over the armature, forming your desired shape.
– Once dry, paint and embellish your creation.
– Hang it on the wall for a stunning display.
This artistic project not only beautifies your room but also fosters creativity and collaboration.
12. Colorful Washi Tape Shapes

Washi tape is a versatile and playful material that allows you to create shapes and patterns on your walls easily. This fun project is simple and can be changed frequently, making it ideal for anyone who enjoys switching up their decor. Imagine vibrant geometric patterns or whimsical hearts adorning your walls, bringing a fresh and exciting touch to the room.
To create washi tape art, gather a variety of tapes in different colors and patterns. This project is budget-friendly and perfect for expressing creativity without the commitment of paint.
Here’s how to create washi tape art:
– Select a variety of washi tapes.
– Plan the design on paper or directly on the wall.
– Start applying the tape in your chosen shapes.
– Layer different tapes for added interest.
– Enjoy the easy transformation!
This decor idea is both inexpensive and fun, keeping your space feeling fresh and stylish.
13. Nature-Inspired Wall Hanging

Bringing elements of nature into your room through a DIY wall hanging adds an organic touch that enhances the atmosphere. Using twigs, leaves, and other natural materials, this project allows you to connect with the outdoors while creating beautiful decor. Imagine a wall adorned with delicate dried flowers and rustic branches, creating a calming and serene environment.
To create your nature-inspired wall hanging, gather materials from your backyard or local park, ensuring they are dried and preserved. This project is perfect for nature lovers and can be customized to fit your room’s color scheme and style.
Here’s how to create a nature-inspired wall hanging:
– Gather materials: twigs, dried flowers, and string.
– Create a base using twigs tied together.
– Attach dried flowers and foliage using string or glue.
– Hang it on the wall with a hook or twine.
– Optionally, add lights for a whimsical touch.
This decor piece brightens your room and fosters a connection to nature, enhancing the overall aesthetic.
Nature-Inspired Wall Hanging
Editor’s Choice


14. Reimagined Vintage Frames

Old frames can be upcycled into stunning displays that add character and charm to your teen room. This project not only recycles materials but also allows for a vintage flair that complements any decor style. Imagine a gallery wall filled with eclectic frames, showcasing personal artwork, quotes, or fabric that reflects your unique taste.
To create reimagined vintage frames, explore local thrift shops or garage sales for frames in good condition. This project is versatile, allowing you to mix and match styles for added interest.
Here’s how to create reimagined vintage frames:
– Collect various vintage frames in good condition.
– Paint them in colors that match your decor theme.
– Arrange them on a wall in a gallery-style layout.
– Fill with personal artwork, quotes, or fabric.
– Mix and match different frame styles for added interest.
This decor piece serves not only as a conversation starter but also showcases your creativity and personal flair.
Reimagined Vintage Frames
Editor’s Choice


15. Personalized Quilt Wall Hanging

A quilt wall hanging adds warmth and character to your teen room, merging textiles with artistry. This project allows for great personalization and creativity, as you can choose colors and patterns that resonate with you. Picture a beautifully sewn quilt hanging on your wall, creating a cozy focal point that invites comfort and style.
To create your quilt wall hanging, gather fabric swatches that speak to you and consider incorporating personal touches. This ongoing project can evolve over time, allowing you to add new squares as you discover new fabrics or themes.
Here are the steps to create a quilt wall hanging:
– Gather fabric swatches in colors and patterns you love.
– Cut the fabric into squares or triangles.
– Sew them together in a pattern.
– Add a backing fabric and hang using rods or clips.
– This can be an ongoing project, adding new squares over time.
This quilt wall hanging not only beautifies your space but also creates a cozy atmosphere that feels like home.
Personalized Quilt Wall Hanging
Editor’s Choice


16. Upcycled Door Decor

Transforming an old door into a decorative piece serves as a unique focal point in your teen room. This creative project not only adds character but can also be functional, doubling as a bulletin board or storage space. Envision an old door painted in a bright hue, adorned with hooks for accessories, making it both stylish and practical.
To create your upcycled door decor, search for an old door at garage sales or flea markets. This project emphasizes sustainability while allowing you to express your personal style in an innovative way.
Follow these steps to create upcycled door decor:
– Find an old door and remove hardware.
– Sand and paint the door in a fitting color.
– Use one side as a bulletin board by adding cork or fabric.
– Decorate with hooks for hanging items.
– Hang it as a statement piece or use it as a partition.
This project not only highlights creativity but also creates a functional item that adapts to your changing styles.
17. Inspirational Quote Wall

Creating a dedicated wall filled with motivational quotes and affirmations adds a personal touch that inspires daily positivity. This decor idea transforms a simple wall into a source of encouragement and motivation, serving as a daily reminder of your aspirations and dreams. Imagine a wall adorned with beautifully framed quotes that resonate with you, creating an uplifting atmosphere.
To create your inspirational quote wall, gather quotes that inspire you and consider using a cohesive color scheme. This project allows for continuous creativity as you update and rearrange your quotes over time.
Here’s how to create an inspirational quote wall:
– Collect quotes that inspire you – write them down or print them out.
– Select a color scheme that matches your room decor.
– Use frames or clips to display quotes creatively.
– Arrange them in a visually appealing way.
– Update the quotes regularly to keep inspiration flowing.
This project adds a personal touch to your space while motivating you through daily affirmations and encouraging words.
18. Textile Wall Hangings

Incorporating textile wall hangings brings warmth and texture into your room, creating an inviting atmosphere. Macramé or fabric weavings can serve as both art pieces and decor elements, softening the overall aesthetic. Picture a beautifully knotted macramé hanging adding depth and charm to your wall, creating a cozy vibe that feels both stylish and comfortable.
To create your textile wall hangings, choose materials such as yarn, fabric, or natural fibers, which are often easy to source. This project allows for creativity and personal expression, making it a wonderful addition to your decor.
Here’s how to create textile wall hangings:
– Choose your materials: yarn, fabric, or natural fibers.
– Decide on a design – it could be a simple tapestry or complex macramé.
– Use a branch or dowel for hanging.
– Weave or knot the fibers to create your design.
– Hang it on the wall to add a boho or rustic charm.
This textile art adds dimension and interest to your room, blending style and comfort beautifully.
Textile Wall Hangings
Editor’s Choice


Conclusion

These 18 teen room wall decor ideas emphasize the importance of personal expression and creativity. With a mix of DIY projects and upcycled materials, transforming a space into something uniquely yours has never been more achievable. Letting your personality shine through your decor not only makes your room more inviting but also creates a sense of comfort and belonging. Why not start a project today and see how your room can reflect your individuality in a fun and stylish way?
Note: We aim to provide accurate product links, but some may occasionally expire or become unavailable. If this happens, please search directly on Amazon for the product or a suitable alternative.
This post contains Amazon affiliate links, meaning we may earn a small commission if you purchase through our links, at no extra cost to you.
Frequently Asked Questions
What are easy, budget-friendly upcycled ideas for teen room wall decor?
Start with what you already have—old posters, fabric scraps, bottle caps, wood scraps. Turn them into a gallery wall using mismatched frames or clear acrylic mounts. Add a personal touch with initials, quotes, or hobby icons.
Tip: group 3–5 color-coordinated pieces for a cohesive teen bedroom design that still feels dynamic. Use upcycled materials to keep costs down while boosting personalized decor ideas.
How can I tailor DIY wall art to reflect my teen’s personality and style?
Ask what colors energize or calm them, what hobbies or songs they love, and what vibe they want—bold graphic, cozy boho, or sporty minimal. Then pick 2–3 DIY projects using upcycled bases (old canvases, pallets, cork boards). Start with a quick mood board, measure wall, then mock layout on the floor and tape to wall before mounting.
With each piece, aim to blend teen room wall decor, creative wall art, and personalized decor ideas.
What materials and tools do I need to start creating upcycled wall decor for a teen room?
Collect staple supplies: old frames, fabric scraps, cork, wood scraps, paint, spray sealant, hot glue gun, staples, scissors, ruler, and a level. Have basic tools: hammer or drill, nails, mounting hardware. Pick a simple starter project—wrap a canvas in fabric or turn an old frame into a mini gallery.
These essentials help you create stylish wall accessories and teen room wall decor that pop.
How can I combine upcycled wall art with other stylish wall accessories to create a cohesive teen bedroom design?
Start with a shared color palette, then choose a focal piece (a large upcycled art or statement shelf). Layer texture with fabric banners, metal accents, and natural wood. Use uniform frames or consistent matting to unify a gallery wall, and mix heights for visual interest. Finish with simple, practical storage tucked into the design to keep the space tidy and inspiring.
For ongoing youth room inspiration, keep a rotating display so the space feels fresh without a full redo. Add a few creative wall art pieces to reinforce the teen bedroom design.
Are there quick DIY projects that can be completed in a weekend for a visible impact?
Absolutely. Try fabric pennant banners, map corkboard, geometric tape art, or an upcycled frame collage. Plan a simple layout first, then assign a weekend to prep, assemble, and hang. Use a sealant or clear spray to protect surfaces and make the designs durable, especially in a teen room that gets daily wear.
These fast wins deliver standout teen room wall decor updates and satisfy the craving for creative wall art with personalized decor ideas.
Related Topics
teen room wall decor
DIY teen decor
upcycled materials
personalized wall art
youth room inspiration
creative decor ideas
budget friendly
stylish accessories
easy DIY
modern teen design
boho style
wall art projects